A Quick Guide to More Effective Animations
PowerPoint animation can be an unwieldy topic to cover, especially if you need to cover it quickly. It’s something that at some point, strikes fear into every presenter’s heart, or at the very least, causes them to throw their hands up in frustration, leaving the audience to sit through a presentation filled with ‘Bounce’ and ‘Boomerang’ animations, shudder.
However, it needn’t be so! Even if you’re new to PowerPoint or if you are someone who doesn’t have a ton of time on their hands, there are very easy and quick ways you can use PowerPoint animation to your advantage in your next presentation.
What is the big advantage, you might be asking? Well, using animation is a great way to engage your audience. By staggering your information delivery and allowing viewers to process what you are saying in bite-sized pieces, you actually help their overall comprehension, and allow them to walk away with a greater understanding of your key messages. This leads to more success overall: better internal communication, more cases won or increased sales of your products. Sounds great, right? So, what are you waiting for, let’s dive in!
1) Basic Animations
Entrance/Exits
To start things off, I’m going to cover some tips and tricks for basic animations. You might already know some of these, but this section might also serve as a nice refresher for more seasoned PowerPoint users.
The most basic animations PowerPoint gives you are Entrance and Exit animations. Very simply, they allow the object you select to enter and exit the slide. Some of the most recognizable ones are Appear, Fade, Fly-in, Wipe and Zoom. Each entry has a corresponding exit animation of the same name. At BrightCarbon, we use these basic staples every day, and whether used in combination (more on that in the Advanced section) or by themselves, they can add a nice bit of flair to your presentation without being overwhelming or distracting.
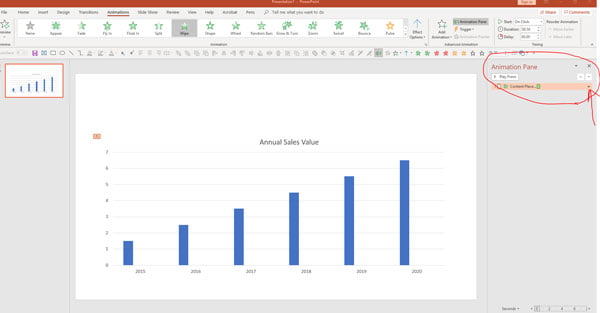
As an example, let’s look at how we could use a simple Wipe animation to animate a chart. Let’s say you have a column chart that you’d like to animate, that covers 2015-2020, and you’d like data for each year to animate in turn as you talk about them.
If you select your chart, navigate to the Animation tab in the ribbon and select Add Animation->Entrance->Wipe, and then Effect Options->From Bottom->By Category, you will have a great starting point for a presenter-friendly graph.
If you open the Animation Pane and click the tiny arrow next to your chart, you will see the default setting is to have each year’s data come in on a ‘click’, which will work great for our purposes. To change this, you just need to set each year’s data to Start After Previous, which will allow all the columns to wipe in sequentially on one click.
Now, let’s say you want to have the data for 2020 disappear, to emphasize that we aren’t sure what those numbers will be yet, or some similar point. Again, click the tiny arrow and then Effect Options->Chart Animation->Group Chart by Category.
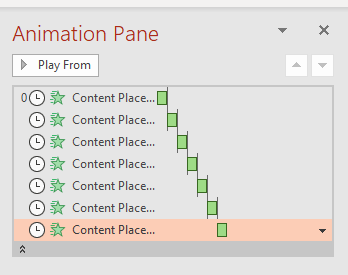
This will break the chart animation into the individual columns and you can then, still in the Animation Pane, select the animation for the 2020 data and Add Animation->Exit->Fade. As before, the default setting would be for the data to exit on a ‘click’. That’s what we want this time so leave it like that and the 2020’s data will fade out on the next click.
*The important piece to note here is make sure you click Add Animation instead of selecting an animation from the ribbon display, as this will override your existing animations on that object.
Entrance and exit animations are the bread and butter of PowerPoint animations. Now that we’ve covered that, we’ll get into some more complicated animations.
2) Mid-level Animations
Motion Paths, Animation Combos
Although entrance and exit animations are much more common and arguably more useful for the everyday presentation, most PowerPoint users are most excited for the more flashy animations, which we will cover in the next two sections. What I consider mid-level animations are things like Motion Paths or combinations of simple animations used together to create a new effect. Though they both might seem complicated, there are practical uses for each.
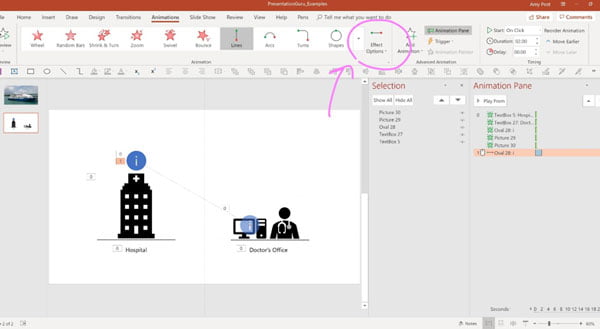
Let’s look at one helpful application for a motion path. Showing ‘information being transferred’ is one of the more common situations we may need to illustrate. In the example below we want to show a doctor receiving patient data from another hospital:
The easiest and most effective way to illustrate this is to use icons and motion paths. The images or icons represent all the components of this scenario (hospital, doctor, computer, information) which you can lay out in the most intuitive way (we read left to right, so we always recommend setting things up from left to right). In this case, let’s say we have the other hospital on the left side of the slide, and the doctor on the right. You’ll want to place your information icon on top or above the hospital on the left to start.
Then, once you have your icons laid out, I would recommend applying a Fade Entrance animation to all the components as an initial step. The next step will be to add motion to the information icon. Select it and go to Add Animation->Motion Paths->Lines.
By default, PowerPoint will add a downwards motion path. However, we want ours to go left to right, so go to Effect Options->Right to change the direction.
You might notice another issue here, which is that our motion path isn’t going exactly to the endpoint where we want it to go. You’ll need to adjust this by clicking on the red right-facing arrow that appeared when we added the motion path and dragging it to the right endpoint, right over the doctor’s computer.
Now, if you play through the animation, you’ll see everything fade in, and on a click, information moves to the computer. You can finish off the sequence by adding a Zoom exit animation to the information icon and set it to Start After Previous so it vanishes after moving. Ta-dah, you now have your very own animation sequence!
Mastering animation chains with Motion Paths can take you really far as a PointPoint-er and opens the doors for all kinds of creative applications. One that is especially cool is a parallax motion effect, for which we have created a nifty tutorial on BrightCarbon’s website.
3) Advanced Animations
Masking and Motion Paths
In this final section, I want to give a brief introduction to using Masks in combination with motion paths. This is an extremely versatile and helpful hack if you’re interested in creating smooth, impressive animations that look more After-Effects and less PowerPoint-y.
For this example, we’re going to create a text box that smoothly flies out from behind a photo, like so:
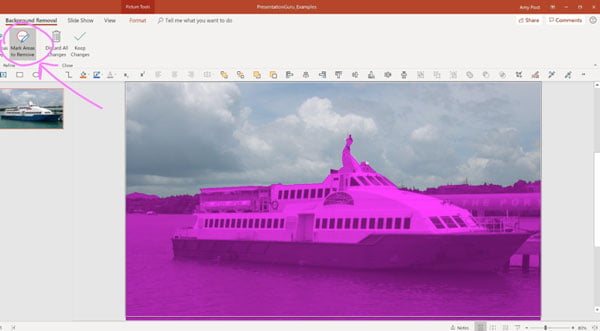
To start, grab an image that has a foreground and background, for example a boat on the water with a sky background. You’ll need to crop out your ‘mask’, which in this case, would mean separating the water/boat from the sky. You can do this either using Photoshop or by using the Remove Background tool on PowerPoint.
For you’re using the latter option, you will need to duplicate your image, so that you can create the two halves for the mask. Then go to Format->Remove Background. Then, using the pen tools available, highlight the areas in purple that you’d like to be removed, and select Keep Changes. Do this for both pieces of the image (the boat and the sky) and once finished, you’ll be left with two pieces of a photo, that you need to line up on the same slide to recreate the original image.
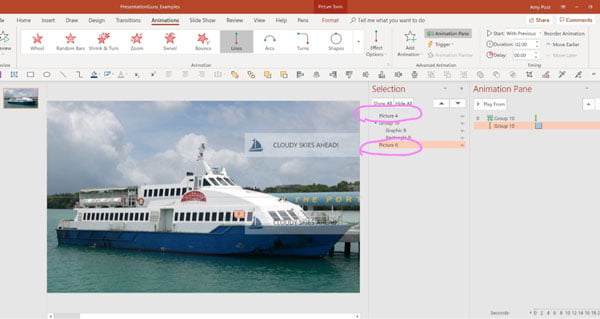
Next, add a text box with some sample text, and position it at the bottom of the slide (where we currently have water). Then, add an upwards motion path to your text, which ends somewhere in the sky.
The next step is to make sure our slide layers are correct. Select the text and go to Home->Arrange->Send Backward, until your text is hidden behind your boat foreground layer, but not behind the sky. (You can confirm this by checking their order in the Selection Pane). This way, it will move upwards behind the boat where it is invisible and seem like it’s ‘popping up’ into the sky.
To make your motion path ‘smooth’, go to the Animation Pane and select Effect Options and it will open a menu. Where you see Smooth start, drag the bar all the way to the right and then press ‘OK’. Now, you should be ready to play through, and test out your cool new sequence!
If you are inspired to get more adventurous with your animations check out our in-depth tutorial of masking effects in PowerPoint.
Conclusion
In conclusion, PowerPoint animation can sometimes seem like a can of worms, but in reality it’s much easier than you think. Once you get into the habit of adding simple animation to all your presentations, it will benefit you tremendously in the long run, and the results will speak for themselves.
All you need to remember is to a stick to a few rules of thumb:
- Use clicks to stagger information.
- Simple animation is better in most cases, and
- No boomerang…ever!
Amy Post
Latest posts by Amy Post (see all)
- A Quick Guide to More Effective Animations - 28th February 2019
- Master the Slide Master - 20th March 2018
- 5 Ways to Make Your Presentation More Visual and Effective - 6th April 2017


Silvia van de Berg
29th October 2020 at 5:33 pm
Hi,
Take a look at this tutorial we made for you, on how to create moving images, pictures or shapes in PowerPoint, all using the free iSlide add-in of course.
https://islide-powerpoint.com/en/features-en/tween-en
Once you have worked with it,… You never want anything else!
With scroll bars, for Mac and Windows in 9 major languages!
Only needs an email address to register and get started.
Contact me if you have any questions at all.
Regards, Silvia